This post will outline the steps required to install SharePoint 2019 using SQL Server 2019 back end, on Server 2019. requirements are as follow:
- 2 Virtual Machines, Server 2019 Standard OS joined to a domain as member servers already configured with static IP addresses.
- We will download evaluation copies of all the software for this example, they can all be converted to commercial licenses any time before the 180 day evaluation period expiration.
- The 2 VM’s will need to have communications between each other. They should be able to ping each other using NetBIOS and FQDNs.
- To prevent errors during setup, we will disable UAC and Windows firewall on both VMs. Once SharePoint setup is complete, enable the firewall and open the communications ports and re-enable UAC to increase security.
- If the 2 VMs are on different subnets and there is a firewall in betweeen, open the required comminications ports.
- You will need permissions to be able to create ADDS groups and grant local admin privileges to the 2 VMs, or have someone who will do that for you.
- You will need to create a domain user account, in this case we will create one named: sharepoint
Our two member servers running SQl and Sharepoint will be named SQL and SP, however any name you choose is fine. Before we begin the installation, we need to disable the UAC, firewall and grant local administrative rights to the sharepoint user on both the SQL and SP server.
Preparing the SQL and SP Servers
Open control panel…

Disable the Windows Defender firewall on the domain profile.

From the User Accounts MMC, select Change User Account Control Settings and slide the UAC lever to the bottom.

Open a command prompt as administrator and execure the command: control userpasswords2. Click on the advanced tab, then the advanced button in the advanced user management section and add the sharepoint user account to the local administrators group.

Finally, log in to both SQL and SP VMs using the sharepoint user account.

SQL Server 2019 Setup
To begin, download the SQL 2019 evaluation edition executable file from Microsoft.

Execute the file from SQL server and select the new SQL server stand alone adition install as shown below.

The program will check that you have met the requirements before you can proceed with the install. You can still install if the domain controller gives you a warning but I advise you to install SQL on a member server, not a domain controller.

Select the features to install. At a minimum you should select Database Engine Services and Full-Text and Semantic Extractions.

In the instance configuration screen, you can choose the default or a named instance of your choice. For this example, we will name the instance SHAREPOINT.

Once the SQL installation is complete, download and install SQL Management Studio. Management studio will allow you to managed the SQL server and it’s databases from an easy to use, graphical console. Once you have installed SQL Management Studio, it’s time to move to the SharePoint server.
SharePoint 2019 Server Setup
On the SP server, open Powershell as an administrator and execute the following command.
Install-WindowsFeature NET-HTTP-Activation,NET-Non-HTTP-Activ,NET-WCF-Pipe-Activation45,NET-WCF-HTTP-Activation45,Web-Server,Web-WebServer,Web-Common-Http,Web-Static-Content,Web-Default-Doc,Web-Dir-Browsing,Web-Http-Errors,Web-App-Dev,Web-Asp-Net,Web-Asp-Net45,Web-Net-Ext,Web-Net-Ext45,Web-ISAPI-Ext,Web-ISAPI-Filter,Web-Health,Web-Http-Logging,Web-Log-Libraries,Web-Request-Monitor,Web-Http-Tracing,Web-Security,Web-Basic-Auth,Web-Windows-Auth,Web-Filtering,Web-Performance,Web-Stat-Compression,Web-Dyn-Compression,Web-Mgmt-Tools,Web-Mgmt-Console,WAS,WAS-Process-Model,WAS-NET-Environment,WAS-Config-APIs,Windows-Identity-Foundation,Xps-Viewer -IncludeManagementTools –Verbose

Once the pre-requisite components have been installed, restart the SP server then download SharePoint 2019 Evaluation from the Microsoft evaluation center. You will notice a pair of installation keys. Make sure you use the correct key, whether standard or enterprise, as you can only convert the evaluation version of SharePoint to its respective install key version.

For this install, we are going to use the standard edition product key: F2DPD-HPNPV-WHKMK-G7C38-2G22J
Right click on the SharePoint image and select –> mount.

Run the PrerequisiteInstaller application.

Click next, accept the terms and conditions after reading them and allow the preparation tool to finish.

After the restart, you will receive an error due to the image having been unmounted by the restart. Re-mount the image and run the PrerequisiteInstaller again.


Repeat this process until all prerequisites have been installed.

Next, execute the setup application.

When prompted enter the standard or enterprise product key (F2DPD-HPNPV-WHKMK-G7C38-2G22J)

Click continue, accept the terms after reading them and click continue again. Finally, click on the install now button to begin installation. When the process completes, you will be prompted to run the configuration wizard.

Press close and allow the server to restart itself. After logging back in, the SharePoint Configuration Wizard will automatically start. You will notice that you have a SharePoint in the start menu with Central Administration, SharePoint Management Shell and the Products Configuration Wizard setup icons.

Running the SharePoint Configuration Wizard
Start the SharePoint Products Configuration Wizard and select create new server farm.

Enter the NetBIOS name of the SQL server, a database name (or leave the default) and the user domain\username we created to install and run SharePoint.

Next select a passphrase for the SharePoint farm as indicated below.

In the next screen, choose Single-Server farm to run all the roles on a single server.

In the next screen select a port for central administration and an authntication provider, either NTLM or Kerberos. For our example we are setitng the port to 16763 and using NTLM authentication.

A final screen with the settings you chose throughout the wizard will display, if you find the settings to be correct, click next.

When finished, restart the SP server. Then log back in and open SharePoint 2019 Central Administration from the SharePoint menu.

At this point, if you are familiar with SharePoint, you are ready to create a site collection and Web application from the application management menu. Otherwise, select the configuration wizards link to have SharePoint wizard walk you through it.

After clicking on the Configuration Wizard link, select Launch the Farm Configuration Wizard.

Next click on the start the wizard button.

Select the service account we created for sharepoint and the service application options. if you are not sure about which ones to choose, leave the defaults. You can later add/remove them from Central Administration.

It may take some time for the SharePoint Wizard to create the database, please be patient. You will then be presented with the next screen to enter the site name, description and URL.

Leave the URL as it is since this is going to be our root site. Select a template, then click next.

The team site (modern or classic) is probably a good first site template. When finished, open a new browser window and navigate to http://SP (or whatever you named your server) to view the home page.

Once your site appears, you may want to add a FQDN using alternate address mapping. By default, SharePoint is accessible via the server’s NetBIOS name. While this works well inside a LAN segment, if you have a WAN or VPN you will need an FQDN to reach the SharePoint site from other subnets (unless your VPN allows NetBIOS broadcasts, and most don’t).
To configure an FQDN, open SharePoint administration and navigate to Application Management –> Configure Alternate Access Mappings.

From there click on the Edit Public URLs link and select your SharePoint site from the drop down box in the AAM collection.

Leave the default NetBIOS name and add your FQDN to the Intranet dialog box.

After you have saved the AAM, you must add a A record in your DNS that points to the SharePoint server’s internal IP address.

SharePoint 2019 Search Configuration
Finally, if you want your site to be index for seacrh, we have to create a crawler schedule. Otherwise, SharePoint 2019 search will not return any results.
To do this, go to Central Administration –> Search Administration –> Content Sources. Click on the site content source and select edit.

In the crawl schedule, set a full crawl and incremental crawl schedule. The frequency should be based on how fresh you want your content to be versus the amount of computing resources available on the SharePoint server. The search functions takes up a lot of resources so crawling too frequently will slow down SharePoint. Considering that most IT departments ask for this, and get budgeted for this instead, my suggestion is to do a daily or weekly full crawl and a more frequent incremental crawl.
.jpg)

Once you have created a schedule, click on the start all crawls link to initiate the first crawl and index.

Configuring SMTP to Send Alerts
If you want SharePoint to send E-Mail alerts, you will need to set up an SMTP server. Any SMTP will do however, for this demo I am going to set up a self-hosted SMTP service on the SharePoint server.
From the SharePoint server, open the Server manager and click on the add roles and features link. Select SMTP Server from the features options box and proceed to install the SMTP feature.

Open IIS 6, right click on the SMTP virtual server and select properties. In the access tab, click on the relay button.

Add 127.0.0.1 and the SharePoint server’s local IP address to the relay list. This will allow SharePoint to send e-mail using the SMTP service.
If you want to test the SMTP server to make sure it works, open PowerShell as an administrator and install Telnet using the following command:
install-windowsfeature telnet-client
Once telnet has been installed, use it to test mail relay service.
Telnet 127.0.0.1 25
Then use telnet commands to send an email from the SharePoint server.
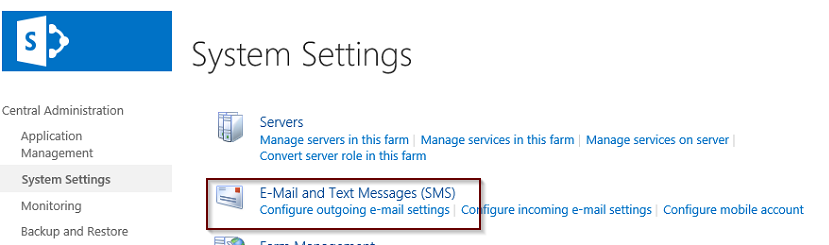
Open SharePoint General Administration –> System Settings –> Configure Outgoing E-Mail Settings

Copy the settings as shown below, using the local IP address of your SharePoint server as the SMTP server’s address.

The above SMTP server is simple and it will get the job done. It has some limitations but for sending intra-conpany alerts from SharePoint it’s more than sufficient. If you want a more robust mail service, it’s beyond the scope of this tutorial but you can see where to enter the settings from the example shown.
Michael Angelo
Miguel Fra
Michael Angelo
Andy
Miguel Fra
Mike
wp-admin