Step by Step Install OpenNMS on Ubuntu 20.4
by Miguel Fra at 7:08 PM in Software Apps, SNMP, Networking & Communications, Security
You can find the offician installation guide here however in this post we will use a step by step method for installation instructions.
First, install Ubunti 20.4 OS and log in as root user. If you are not already a root user, switch by running the following command:
sudo -i
When you are logged in as the root user, the Ubuntu shell will display root as shown below.
Use the nano text editor to open the file /etc/apt/sources.list.d/opennms.list. At the shell prompt, run the following command:
nano /etc/apt/sources.list.d/opennms.list
Copy and paste the repositories below to the file:
deb https://debian.opennms.org stable main
deb-src https://debian.opennms.org stable main
it should look like this:
Press CTRL+X to exit and make sure you save the changes on your way out.
Add the GPG keys by running the following command:
wget -O – https://debian.opennms.org/OPENNMS-GPG-KEY | apt-key add –
When done, update by running the following command:
apt update
Next, install Open NMS by running the following command:
apt -y install opennms
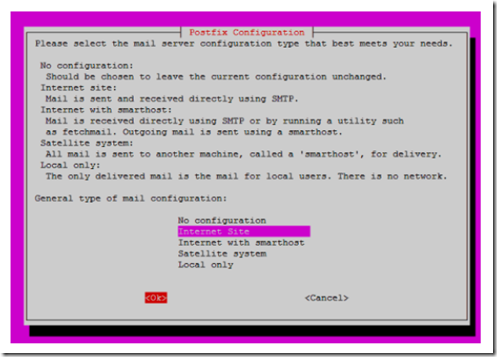
During the install process you will be prompted to manually install OpenNMS using the install command. This step will take place later on so juts select OK to proceed. You will be asked to choose a mail server type. For our example, we will select Internet and configure and SMTP server later on.
In the next screen, enter the Computer Name or FQDN of the system, for example: OpenNMS.mydomain.local.
After the information is entered, OpenNMS will begin the installation process and you will see a progress bar at the bottom of the shell window.
Next, place the OpenNMS repositories on hold by running the following command:
apt-mark hold libopennms-java \ libopennmsdeps-java \ opennms-common \ opennms-db
The repositories should only be enabled when you are going to upgrade/update OpenNMS. You can run the command apt-mark unhold followed by the package names when you want to release the repositories. Later, when you are finished upgrading, place them back on hold running the command apt-mark hold followed by the repository names again.
Next, start the Postgres database by executing the following command:
systemctl start postgresql
Now create and OpenNMS user named opennms and set the user as the DB owner. To do this, execute the following commands:
su – postgres
createuser -P opennms
When prompted, enter the password for the user opennms. The execute the created DB command:
createdb -O opennms opennms
Next, set the postgres password by executing the following command:
psql -c “ALTER USER postgres WITH PASSWORD ‘Your-Password’;”
Replace ‘Your-Pasword’ with your own strong password of choice.
When finished, type exit and press enter so that the shell prompt once again displays the user ‘root’ instead of the user ‘postgres’.
Next, cmake sure there is a loopback rule to allow OpenNMS to access the database on the local interface. To do this, we are going to modify two lines in the Postgres file pg_hba.conf file which can be located in different places depending on the PG SQL version installed.
First, let’s install mlocate command:
apt install mlocate
Next, use the locate command to find the location of pg_hba.conf:
locate pg_hba.conf
The command will return the exact location of the file.
CD into the folder and from there, execute the following command to edit the file:
nano pg_hba.conf
Then scroll down to find the lines shown below and modify the file to look like this:
host all all 127.0.0.1/32 md5 host all all ::1/128 md5
If the lines already look like than then no need to make changes. Otherwise, modify the lines than press CTRL+X to exit and save the changes on your way out.
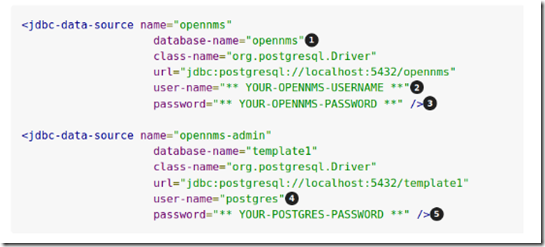
Now, configure the password access in the Open NMS DB by editing the opennms-datasources.xml file. This file is typically located in the /etc/opennms folder however that’s not always the case. If you have troubel locating the file, use the locate command and you did previously to find the exact location.
After you finish, apply the changes by executing the following command:
systemctl reload postgresqlWe will use the nano text editor to make the changes. From the opennms folder, execute the command:
nano opennms-datasources.xml
Modify the XML items marked 1-5 below:
When finished, press CTRL+X and remember to save the changes on your way out.
Next, navigate to the OpenNMS folder located in /usr/shared/opennms/bin and enter the following commands:
./runjava -s
./install -dis
Don’t forget the dot before the forward slash, it’s necessary to execute the program file successfully. Both these files must be run from withing the bin folder so make sure to navigate to /usr/shared/opennms/bin before executing the file.
Now configure the OpenNMS system to automatically start on boot by executing the following command:
systemctl enable opennms
Now run NMS by executing the following command and you are ready to access Open NMS using the default port 8980.
systemctl start opennms
Final Steps
Open in your browser http://<ip-or-fqdn-of-your-server>:8980/opennms
Login with with admin/admin
Click in main navigation menu on “admin → Change Password → Change Password”
Set as current password admin and set a new password and confirm your newly set password
Click “Submit”
Logout and login with your new password


