This post demonstrates how to create a site to site VPN tunnel between a Juniper Netscreen 50 and a Sonicwall Pro 2040 firewall. The examples below can be used with the newer generation firewalls such as the TZ-215. The menus may be arranged differently however, the settings remain the same.
The proceeding IP scheme and settings will be used throughout the exercise. Obviously, you will want to replace these IP addresses with your own.
Main Site: Sonicwall Pro 2040
LAN Subnet: 192.168.11.0/24
WAN IP: 74.169.172.85
Remote Site: Juniper Netscreen 50
LAN Subnet: 192.168.16.0/24
WAN IP: 74.169.172.87
Preshared Key: netscreen (example only, choose your own; preferably more secure)
Configuring the Sonicwall VPN Policy
To begin, log into your Sonicwall Web management interface. Go to network > address objects.
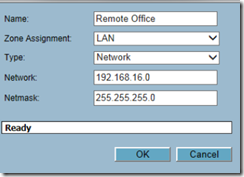
Create a LAN object named remote network with the local IP subnet of the remote site and then click OK.
Go to VPN and click on add to create a new VPN policy.
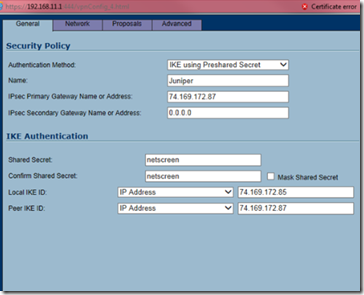
In the general tab, copy the following settings:
Select IKE using preshared secret for the authentication method. Name the policy Juniper and type the public IP address of the remote site in the IPSec primary gateway. Enter the shared secret (netscreen) and enter the main site’s public IP address in the local IKE ID field. Finally, enter the remote site’s public IP address in the peer IKE ID fild and then click on the network tab.
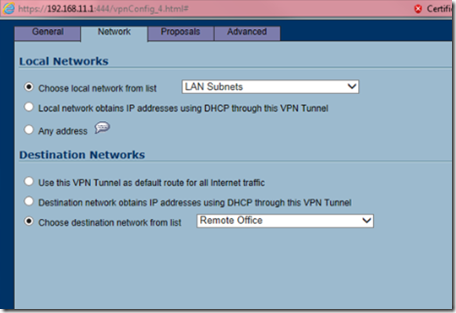
Select LAN subnets for the local networks list and remote office for the destination network and then click on the proposals tab.
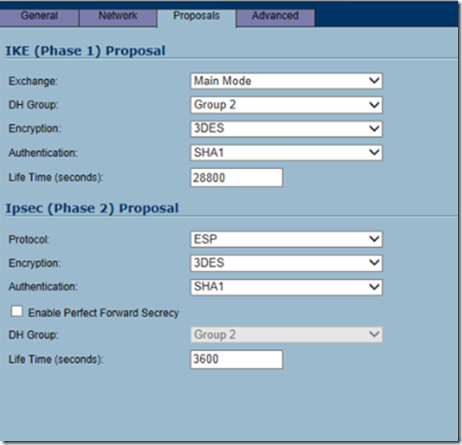
For IKE phase 1, select main mode as the exchange method, Diffie-Hellman Group 2, 3DES, SHA-1 authentication, and 28800 life time. For IKE phase 2, select the ESP protocol, 3DES encryption, SHA1 authentication and 3600 life time. When finished, click on the advanced tab.
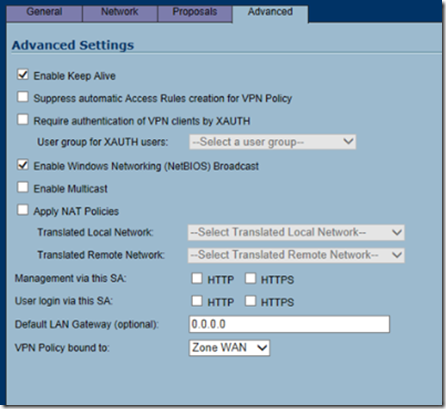
Finally, in the advanced tab, copy the following settings (note: If you do not want to broadcast NetBIOS traffic over the VPN tunnel, you can leave enable Windows networking option unchecked. Check enable keep alive and NetBIOS broadcast and click OK.
Configuring the Juniper Netscreen VPN Policy
Log in to the Juniper Netscreen Web interface and go to VPN > AutoKey Advanced > Gateway and click on the new button.
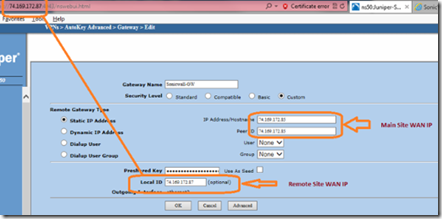
Name the gateway Sonicwall-GW and select custom security level. Select static IP address and enter the public IP address of the main site (Sonicwall) in the IP anndress and peer ID fields. Enter the preshared key (netscreen) and in the local ID field, enter the public IP address of the remote site (Juniper).
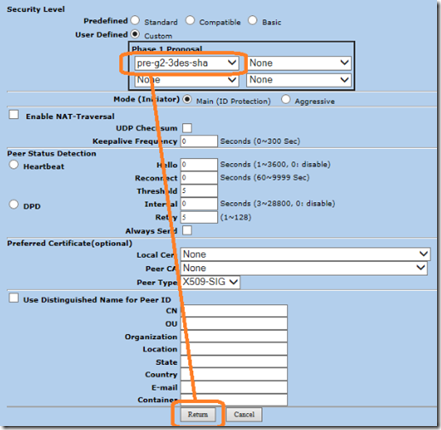
Click on the advanced button to edit phase 1 proposal. Click custom security level and select pre-g2-3des-sha as phase1 proposal.
Click return to go back to the gateway edit screen and click OK.
Go to VPN > Autokey IKE and then click on the new button.
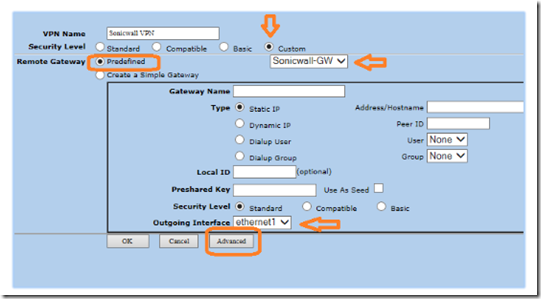
Name the VPN Sonicwall VPN. Select custom security level and predefined remote gateway. Choose Sonicwall-GW from the remote gateway drop down box. In the outgoing interface, select ethernet1 (the untrusted Internet facing interface) and click advanced.
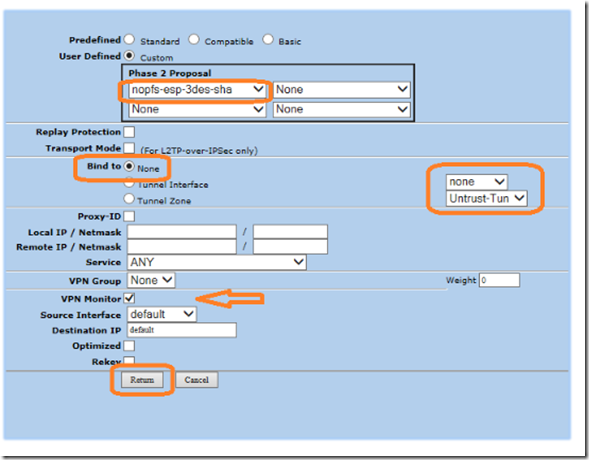
Select custom user defined security level, nopfs-esp-3des-sha as the phase 2 proposal, bind to none & untrust-tun, select VPN monitor and click return.
Back in the edit autokey IKE screen, click OK.
Lastly, we are going to configure a packet filter policy. Click on policies, select from trust zone to untrust zone and click new.
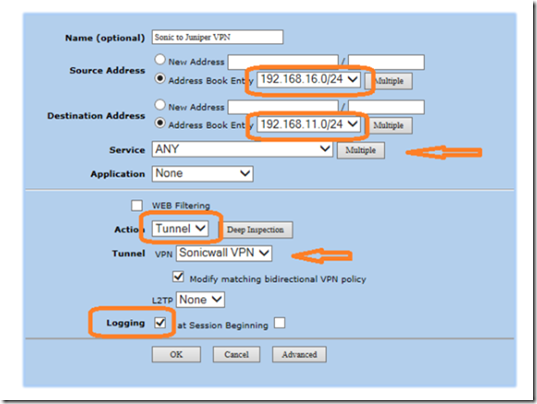
Name the policy Sonic to Juniper VPN. In the source address book, select from an address book entry or select new address and enter the remote LAN subnet IP address (Juniper). In the destination address, enter the main office LAN subnet IP (Sonicwall). Select any as the service, action as the tunnel, tunnel type: Sonicwall VPN, select modify bidirectional VPN policy and finally, enable logging. When finished, click OK.
Click on policies and you should have two inverse policies for bi-directional traffic flow.
To test the tunnel, ping the gateway IP address of the remote location using its private address.

